Case Study: The Bridges Shopping Centre
Introduction The Bridges shopping centre, situated in the heart of Sunderland city centre, is the home
Find out more
Are you looking for added security for your company’s iOS devices? In this article Andrew Lamb, business communications specialist at Cellular Solutions, takes you through the set up process for enrolling an iOS device on Microsoft Intune.
As a company you may be looking at ways to securely manage the data and apps that employees have access to through a company-owned mobile device – this can most easily be managed using a mobile device management (MDM) provider such as Microsoft Intune. From this you can assign policies and apps and provide secure access to company emails and files from a managed device.
Once the Microsoft Intune company portal has been set up, you’ll need individuals to enrol their device on Microsoft Intune – which can be easily done with access to the App store, Safari, a wi-fi connection and by following the step-by-step process below.
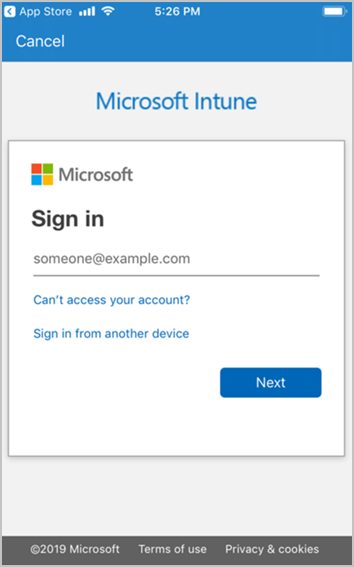
1. Open up the Company Portal and sign in with your work account
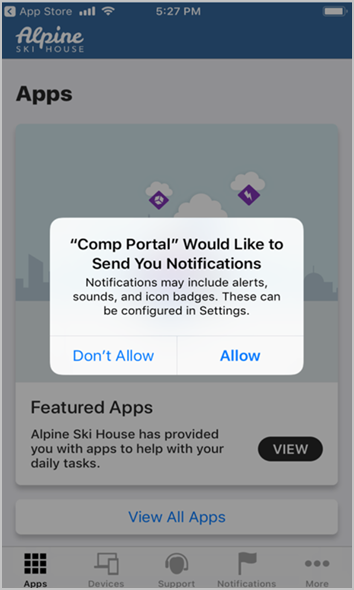
2. When asked if you want to receive Company Portal notifications, tap Allow. This will enable you to receive notifications from Company Portal, for instance when your device settings need to be updated.
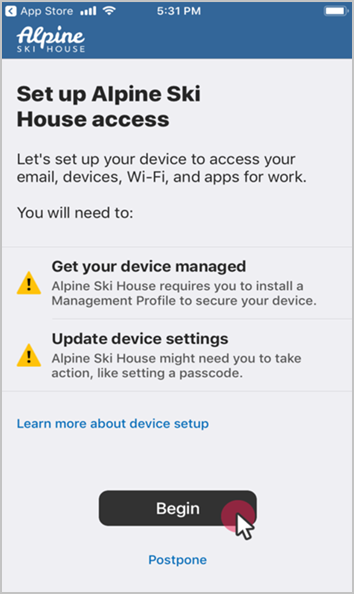
3. On the set-up access screen, select Begin.
4. Read the list of device information your company can and can’t see. Then tap Continue. It’s important to know that neither Microsoft or your company can access personal emails or text messages sent to your phone.
5. Read through the instructions on the What’s next? screen. When you’re ready to download and install the management profile, tap Continue.
The next steps will differ depending on your iOS version, so follow the steps relevant to your version.
6. Safari opens the Company Portal website on your device. When prompted to download the configuration profile, tap Allow. If you’re on a device running:
· iOS 12.2 and later: When the download is complete, tap Done. Continue to step 7 in this article.
· iOS 12.1 and earlier: You’ll be automatically redirected to the Settings app. Skip to step 8 in this article.
If you accidentally tap Ignore, just refresh the page. You’ll be prompted to open the Company Portal app. From the app, you can tap Download again.
Now at this stage it is important to be aware that you must install the management profile as described in the next steps within 8 minutes of downloading. If you don’t the profile will be removed, and you’ll have to restart the enrolment process again.
7. iOS 12.2 and later only: When prompted to open Company Portal, tap Open. The Installing Management Profile screen lists the steps to install the profile.
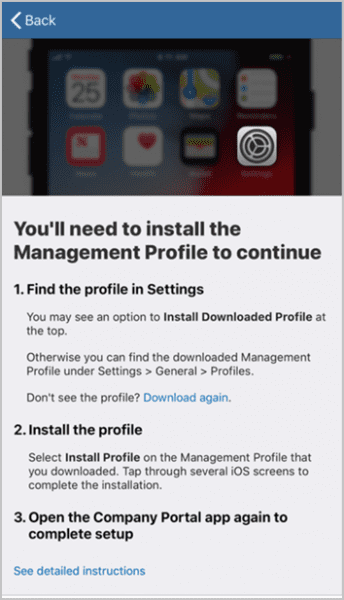
8. Go to the Settings app and tap Profile Downloaded.
If Profile Downloaded doesn’t appear as an option, go to General > Profiles. If you still don’t see the profile, you may need to download it again.
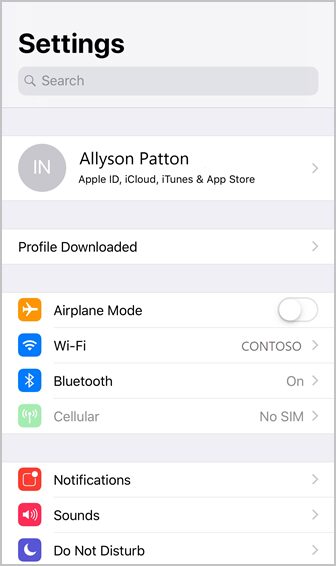
9. Tap Install.
10. Enter your device password. Then tap Install.
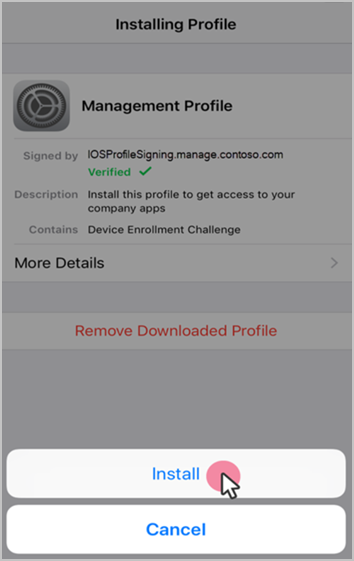
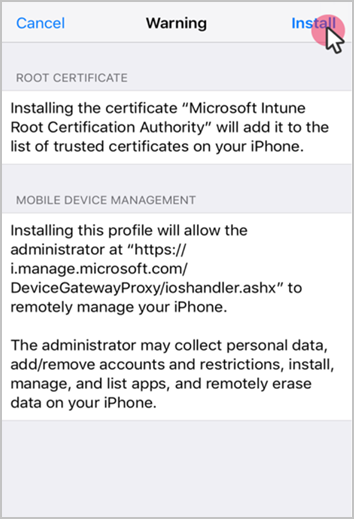
11. The next screen is a standard system warning for device management. To continue with installation, tap Install. If prompted to trust remote management, tap Trust.
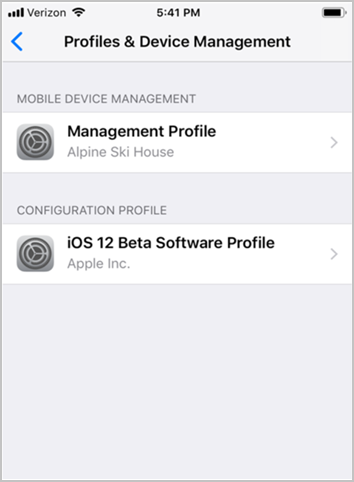
12. After installation is complete, tap Done. To verify that the profile was installed, go to the Profiles & Device Management settings. You should see the profile listed under Mobile Device Management.
13. At this stage, return to the Company Portal app. The Company Portal will start to sync and set up your device. Company Portal may prompt you to update additional device settings. Tap Continue if it does.
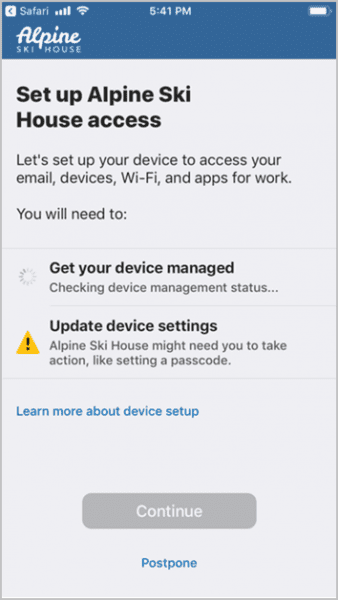
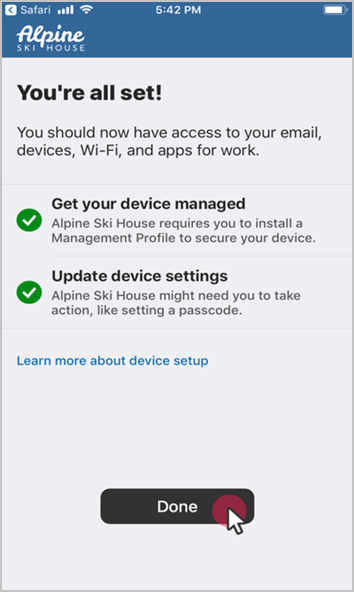
14. Set up will be complete when all items in the list show a green circle. Tap Done. You’re now all set up!
If you would like further advice on troubleshooting for the installation process or would like to know more about additional apps that can support you and that are available through the company portal app, you can contact Andy and the team on 08700 118 000.
Also, if you have a burning question and can’t find the answer on our web pages or blogs you can get in touch or tweet us at @CellSolNE.
Introduction The Bridges shopping centre, situated in the heart of Sunderland city centre, is the home
Find out more
Introduction Founded more than 30 years ago and situated in Carrbridge in the Scottish Highlands, Landmark
Find out more
Changing Lives is a national registered charity that provides specialist support services for 6000 vulnerable people
Find out more

Keep your data safe and secure - and improve cybersecurity.

Cut down on the time and money spent on administration, and free up your team’s resources.

Integrate disaster recovery solutions into your business - and keep running in an emergency.